Building a solid plugin collection for EDM and house doesn’t mean buying everything on the market. I’ve worked with enough tools to know that most producers need a focused set of plugins that handle drums, bass, synthesis, and mixing without unnecessary complexity.
Here’s my go-to list: ujam HYPE, ujam EDEN, PluginBoutique Scaler 3, Serum 2 by Xfer, FabFilter Pro-Q 4, and a few more. These are the essentials you’ll actually reach for when you’re making electronic music.
What I love about these plugins is that they’re built for electronic music producers, not just generic all-in-one solutions. Some are free, some are paid, but every single one fixes real problems you’ll run into again and again when making dance music.
If you’re looking to build or upgrade your plugin arsenal in 2026, these picks are practical, sound great, and actually make your workflow smoother. No pointless extras, just the stuff you’ll use every day in real projects.
1. ujam HYPE
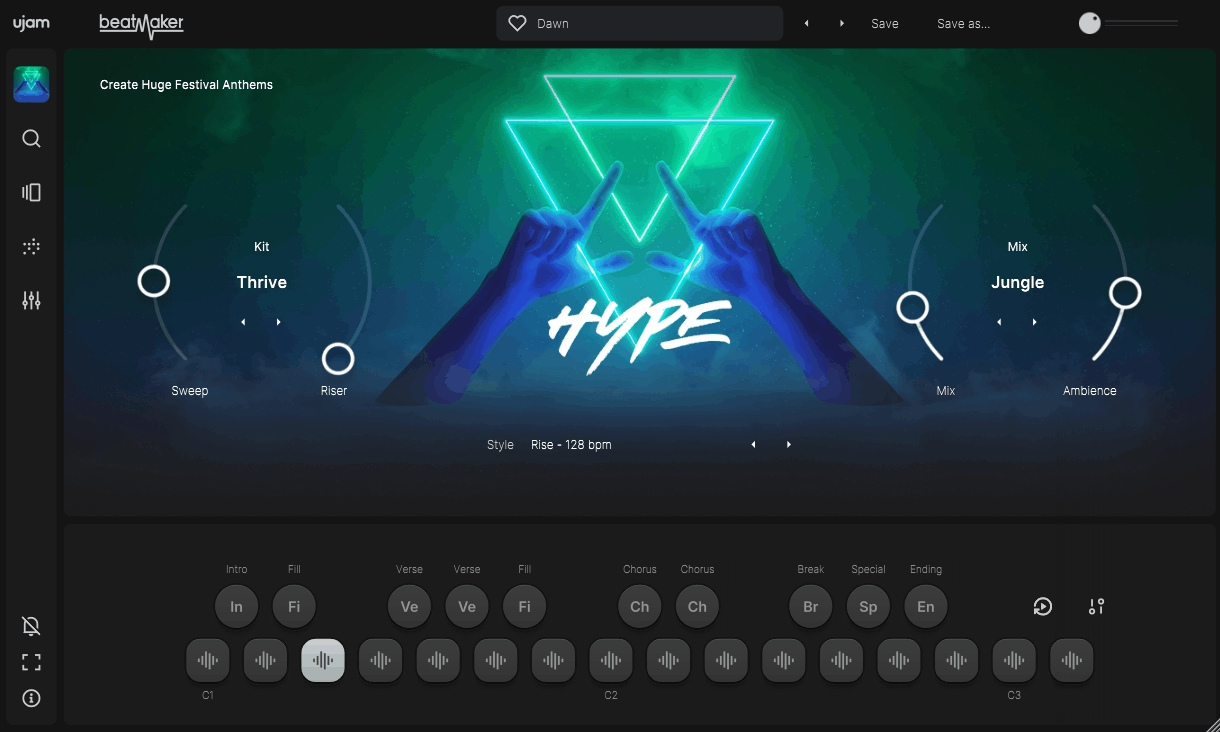
What I love about ujam HYPE is how it just skips all the usual nonsense. Instead of drowning you in a sea of samples and complicated routing, it hands you mix-ready drum sounds that actually fit straight into your track. Honestly, when you’re in the zone, the last thing you want is to waste an hour messing with kick drums when you could be laying down hooks.
The plugin delivers 60 styles spanning house, techno, trap, and future bass, each with multiple variations you can blend. I realized that this approach can save you hours compared to traditional sample libraries because everything is already processed, balanced, and genre-appropriate.
The real genius here is the mixing engine. It automatically tweaks levels and processing as you switch patterns, so your drums always stay punchy and consistent without you having to mess around. If you want pro results without getting bogged down in technical stuff, this is honestly one of the smartest plugins out there right now.
- Sound Architecture That Actually Inspires
The drum engine uses multi-layered samples and clever variation algorithms, so you don’t get that robotic, copy-paste feel you get with basic samplers. Each hit has different velocity layers and round-robin samples, which means your hi-hats and snares always sound fresh.
This makes your patterns sound way more organic, especially at higher velocities where most plugins just fall apart. And with 10 customizable instrument slots, you can build full kits that actually fit your track’s vibe, without having to jump between a bunch of different plugins.
- Performance Controls Built for Actual Workflow
Honestly, the Finisher multi-effect is one of the best features for electronic music. It’s just one knob, but it runs pro-level effect chains like compression, saturation, filtering, and space. At first, it looks almost too simple, but having presets like Stadium, Dirt, and Widener means you’re not wasting time second-guessing your effects chain.
The real magic is when you’re producing fast and need huge drums without opening seven different plugins just to get there.
- Pattern Sequencer That Makes Sense
The phrase-based sequencer gives you over 690 MIDI patterns, all sorted by style and complexity. What’s awesome is these patterns are actually usable, not just random programmer beats you have to spend ages fixing.
You can trigger full arrangements with intro, verse, chorus, and breakdown sections that flow smoothly, so you’re not stuck staring at a blank grid trying to program fills. Plus, you can just drag any pattern straight into your DAW as MIDI, so you’re never locked in if you want to tweak things your own way.
- Mix-Ready Sound Without Effort
Every kit comes with automatic mixing and mastering that actually adjusts gain staging, EQ, and dynamics for the style you pick. This isn’t just a lazy limiter on the output.
The engine even checks your pattern density and tweaks drum levels so nothing gets lost or overpowers the mix. Honestly, this is huge if you struggle with drum balance, because you’re starting from a pro-mixed foundation instead of fighting with levels for hours.
2. ujam EDEN

If you’re making house music, you’ll know the struggle of finding a bass sound that actually has the right warmth and punch. Most synth bass presets just sound way too digital, or you end up spending ages processing them and totally killing your creative flow.
ujam EDEN flips the script by focusing purely on electronic bass for dance music, and honestly, it’s one of the fastest ways I’ve found to get a solid low-end in your track without any hassle.
What really stands out to me with EDEN is how it takes care of all the technical stuff for you, but still gives you enough control to shape your sound exactly how you want. There are 40 different bass styles here, covering everything from deep sub-bass to gnarly synth leads, and each one comes loaded with phrases and patterns that actually work in real tracks.
The real game-changer for me is the built-in mix processing. Your bass just sits perfectly in the mix, no mud, no fighting with the kick. If you’ve ever struggled with getting your low-end right, this plugin sorts it out straight away.
- Phrase-Based MIDI Library
You get over 350 pre-made bass lines, all sorted by genre and energy. These aren’t just random MIDI patterns, either, but actual musical phrases that fit right into your tracks.
Having patterns labeled as Intro, Verse, and Drop means you can build out full arrangements without having to start from zero every time. The drag-and-drop MIDI export is a lifesaver, too. Just grab any phrase, drop it in your DAW, and tweak it however you like. This honestly bridges the gap between instant inspiration and full-on customization better than most bass plugins I’ve tried.
- Smart Sound Engine Design
Now, EDEN uses sample-based synthesis combined with real-time processing rather than traditional oscillators. This hybrid approach gives you the character of recorded analog gear without the CPU overhead of full synthesis engines. The multi-sample architecture means each note has proper tonal variation across the keyboard, so your bass lines don’t sound unnaturally static.
I appreciate how the engine automatically handles release samples and note transitions, creating performances that are way more realistic than those from basic samplers. At the end of the day, it just sounds more alive and less programmed.
- Integrated Mix Processing Chain
Each style has its own built-in EQ, compression, and saturation, all set up for that specific bass sound. This is honestly where EDEN really shines for me. No more guessing which compressor settings to use for sub-bass or mid-range growl, it’s all dialed in by people who actually know their stuff.
The Finisher effect module is the cherry on top, with one-knob presets like Crisp, Warm, and Punchy. Honestly, this feature alone has saved me from overthinking my bass chain more times than I can count.
- Intuitive Performance Controls
Also, the Master section gives you direct access to dynamics, tone, and stereo width without having to dive into complicated menus. I like how the Amount knob adjusts the intensity of your selected style, making it easy to go from subtle groove bass to aggressive synth leads with one parameter.
- Pattern Sequencer Workflow
The built-in sequencer offers customizable loop lengths and swing settings to help you match your track’s groove perfectly. I noticed that the Feel parameter adds humanization without making your timing sound sloppy, which is actually harder to achieve than most people think.
What I love about this is you can audition different patterns while your DAW is running, so you’re always hearing things in context instead of just guessing. For my workflow, this real-time auditioning has totally changed how fast I can find the perfect bass line.
- Multi-Output Routing Flexibility
If you want more control over your mix, you can route your bass to separate mixer channels for even more flexibility.
3. PluginBoutique Scaler 3
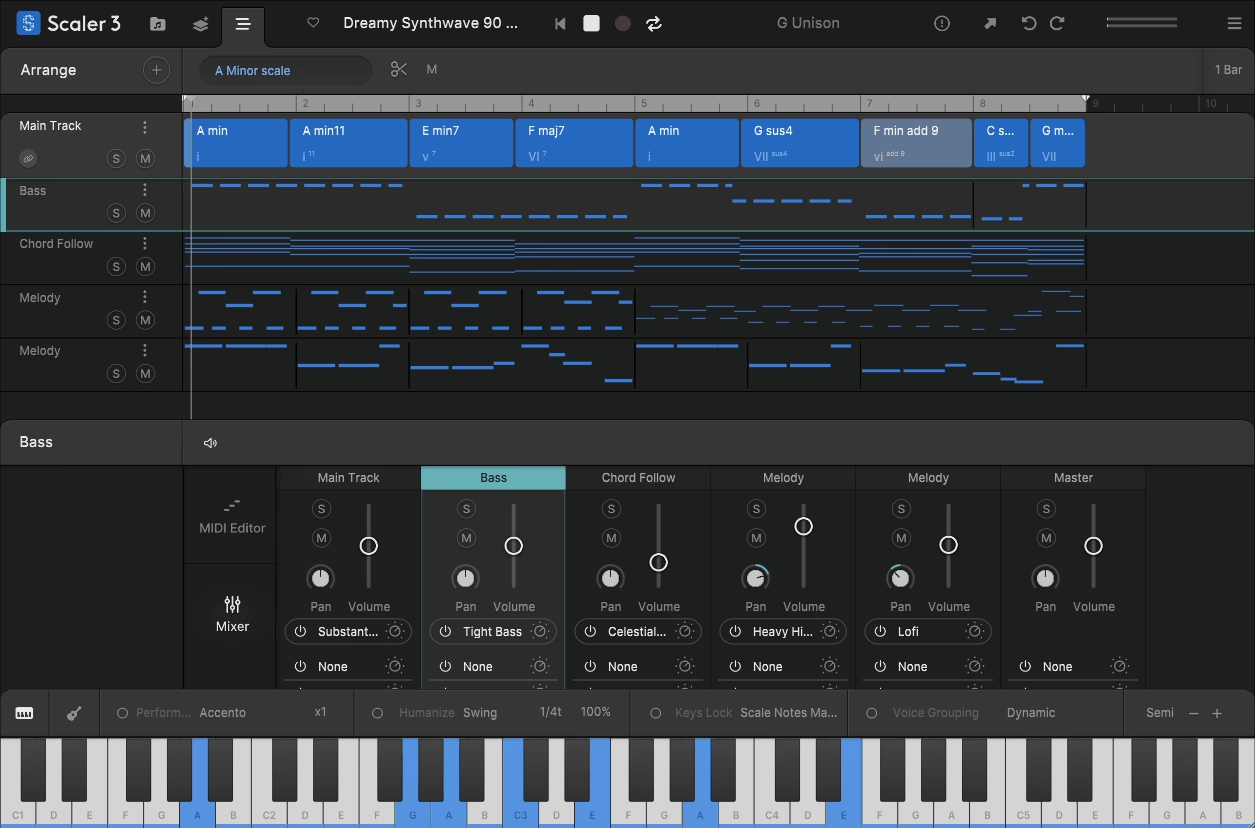
Scaler 3 is basically your own music theory teacher and creative sidekick, right inside your DAW.
What blew me away after using it is that it’s not just throwing out random chords. Scaler 3 actually analyzes over 2,000 scales and chord types, and gives you progressions from all sorts of genres and musical eras.
You can just drop in your audio, have it detect the key, mess around with chord variations that fit, and instantly hear new progressions without knowing any advanced theory at all.
Honestly, this plugin just wipes out the technical barrier between the ideas in your head and actually playing them on the keyboard. That’s the biggest struggle for most electronic producers who didn’t grow up jamming on piano.
- Intelligent Chord Detection System
Scaler 3 can analyze audio or MIDI inputs and instantly tell you what key and scale you’re working in. I found this useful when I’m sampling or working with vocals, because it eliminates the guesswork of figuring out what chords will work.
The detection is smart enough to pick up on complex voicings, extensions, and inversions, not just basic triads. From my experience, it’s accurate enough that I actually trust it in real production, not just for learning.
- Massive Progression Library
You get hundreds of pre-built chord progressions, all sorted by genre, mood, and complexity. I have to say, scrolling through stuff like ‘Dark Techno’ or ‘Emotional House’ and instantly hearing how it sounds with your instrument saves a ridiculous amount of time.
What stands out to me is that you can modify any progression by changing individual chords, adding tensions, or exploring harmonic alternatives without breaking the musical context. I appreciate how it suggests chords that make sense theoretically rather than just throwing random options at you.
Honestly, messing around with Scaler 3 has taught me more about harmony than any theory tutorial ever could.
- Performance and Voicing Tools
Once you’ve picked your progression, Scaler 3 gives you loads of voicing options that totally change how the chords feel. Just switching from close to open voicings or flipping inversions can completely flip the vibe of the same progression.
The humanize and strum features make your chords sound way more real, not just like stiff MIDI blocks. For me, this is where Scaler 3 goes from being just a theory helper to a legit performance tool. Definitely mess around with the voicing presets as they’ll show you musical ideas you probably wouldn’t come up with on your own.
- Melody and Bass Generation
Scaler 3 doesn’t just stop at chords but can spit out melodies and basslines that actually fit your progression. Honestly, I was surprised by how musical the results are.
The melody engine actually understands scale degrees and chord tones, so the lines it makes sound intentional, not just random. I get way better results starting with these and tweaking the MIDI, instead of trying to write melodies from scratch.
That being said, you’re never locked into what it generates since everything exports as standard MIDI. From my perspective, this workflow acceleration is massive when you’re trying to finish tracks rather than get stuck in the writing phase.
- Pad and Instrument Integration
Scaler 3 comes loaded with over 200 built-in sounds, from pianos to synth pads, so you can try out progressions without messing around with external instruments. I love how this keeps the creative flow going, since you’re hearing real musical results right away.
The sounds are actually really usable, not just throwaway presets. Having quality sounds built in means you can get ideas down fast, then swap them out for your main instruments later if you want. Honestly, the piano sounds are so good I’ve kept them in final tracks when they fit the vibe.
4. Serum 2 by Xfer
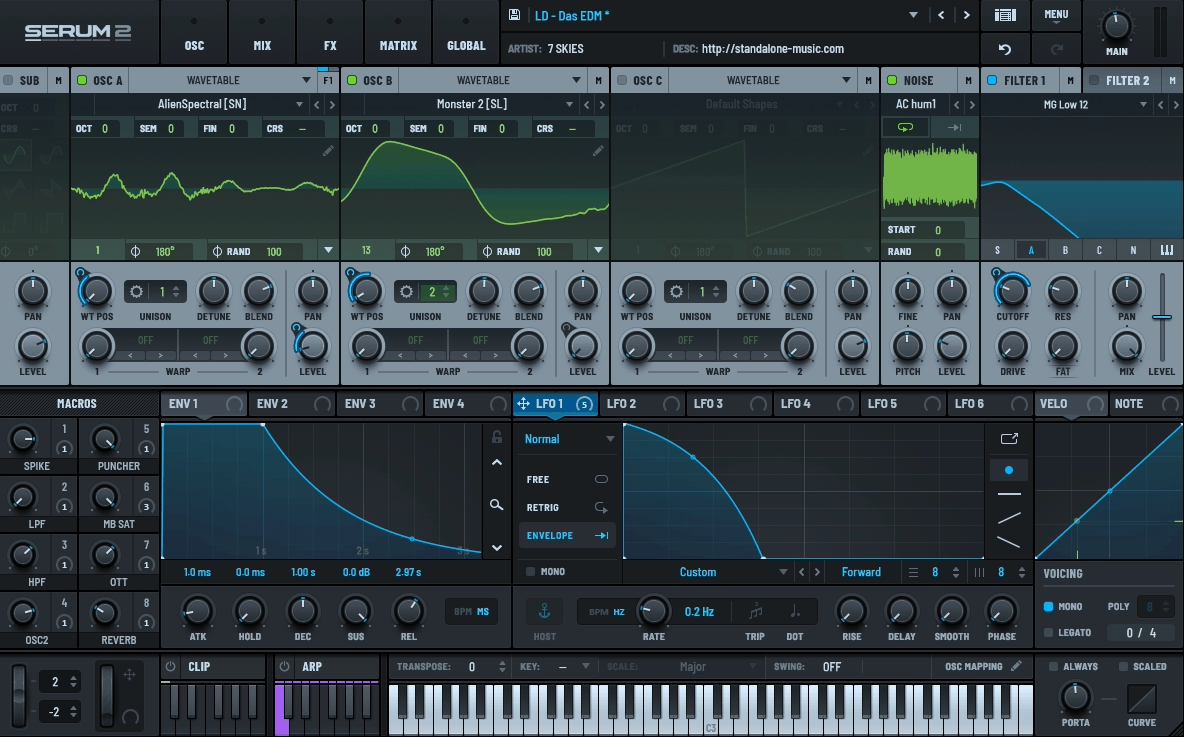
Every producer eventually gets to a point where all their synth presets start to sound the same, and no matter how much you adjust them, you just can’t get that unique sound you’re looking for.
I’ve tried a lot of software synths, looking for one that makes experimenting fun instead of overwhelming you with confusing menus or slowing down your computer. I ended up choosing Serum 2 after getting frustrated with synths that sounded too sterile or were so complex that I lost inspiration before finishing a patch.
What makes this synth stand out is its visual wavetable engine, which lets you see the sound as you shape it. I think the workflow is what really sets it apart from other wavetables, since you aren’t just guessing when you adjust parameters.
Instead of reading endless documentation, you watch waveforms morph in real time, making sound design feel intuitive rather than academic. For me, this visual feedback loop cut my sound design time in half while actually improving the quality of patches I was creating.
- Modulation System That Makes Sense
The drag-and-drop modulation routing removes all the cryptic matrix programming that makes other synths feel like homework. I found that you literally grab a modulation source and drop it onto any parameter you want to control, then adjust the amount with a simple slider. Honestly, this might sound basic, but when you’re in a creative flow, this kind of intuitive design keeps ideas moving forward.
I must say, being able to see modulation amounts visually on every knob means you always know what’s affecting what without getting lost in routing charts. In my opinion, this transparency is exactly what sound design needs because you’re making intentional choices rather than accidentally stumbling into sounds.
- Ultra-Clean Filters With Character Options
Serum 2 comes with several filter types, from precise digital filters to analog-style ones that have intentional imperfections.
I like that the clean filters don’t add any unwanted noise when you need accuracy, while the analog modes bring in subtle warmth and movement. Having both options lets you pick the right filter for your music, instead of being stuck with just one sound.
I’ve noticed that you can use the high-pass and low-pass filters at the same time, each with its own modulation, which is great for creating complex, evolving sounds. The resonance can get intense but still sounds musical, making these filters perfect for dance music.
- Effects Rack With Professional Processing
There are 10 effects slots, covering everything from reverb and delay to distortion, compression, and flanging, all made for electronic music. What stands out to me is that the effects sound polished, not like they were added as an afterthought.
I find the hyper-dimension chorus especially helpful for making leads sound wider without making them feel fake. The built-in multiband compression gives you mixing-level control inside the synth, which is really important when you’re layering several sounds.
The reverb algorithms are clean enough for ambient pads, but you can also get creative and experimental by pushing the settings, giving you more range than most synth reverbs.
- Wavetable Morphing Capabilities
You can do more than just play static wavetables – you can morph between several wavetables using the position control or modulation. This creates evolving sounds that would usually need several synth layers in other plugins.
The morphing is smooth, so you can automate slow changes or use LFOs for rhythmic effects that match your track’s tempo. This feature alone is worth learning, since it lets you create sounds that sample-based or regular subtractive synths can’t make.
I recommend trying out wavetable position modulation early on, since it’s a technique that quickly makes your sounds more dynamic and interesting.
5. FabFilter Pro-Q 4
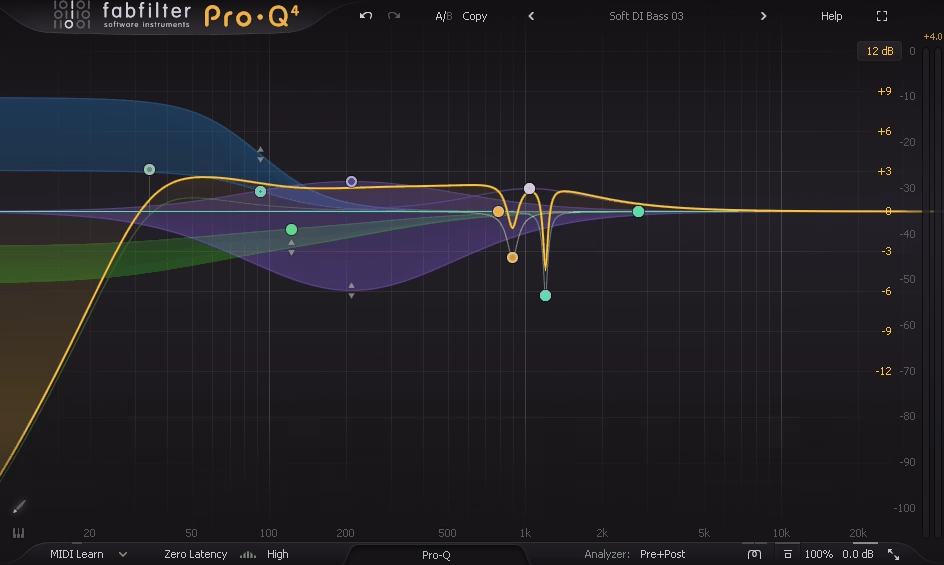
Honestly, I used to think EQ was just about fixing problems until I started working on tracks that needed to compete with professional releases. The reality is that most stock EQs give you the tools but zero guidance on what actually needs fixing or how your changes affect the overall frequency balance.
FabFilter Pro-Q 4 totally changed the way I approach EQ. Instead of just guessing and hoping for the best, it turns EQ into a visual process where you actually see what’s happening and make real decisions, not just random tweaks.
What blew me away is that Pro-Q 4 isn’t just about boosting and cutting. You get real-time spectrum analysis, dynamic EQ, and it even points out nasty resonances before you can even hear them messing up your mix.
Honestly, tweaking EQ blindly versus actually seeing what’s going on in the spectrum is night and day. The learning curve is nothing because after a couple of sessions, you actually get why certain moves work, instead of just copying some random YouTube settings.
- Dynamic EQ Functionality Built In
Every band can act as a dynamic EQ, kicking in only when certain frequencies get too loud. This is a game-changer for dance music, as you can tame harshness without killing the vibe or making everything sound dull.
You also get attack and release controls, so you can dial in exactly how the dynamic EQ reacts to quick hits or longer notes. Using dynamic EQ on vocals for sibilance, or on synths for wild filter sweeps, is just second nature for me now. In electronic music, where everything’s always moving, static EQ just doesn’t cut it anymore.
- Surgical Precision With Natural Sound
The natural phase mode preserves transient accuracy, while the linear phase mode prevents phase distortion when needed. I noticed that switching between these modes dramatically affects how drums and bass interact, especially when you’re making steep cuts or boosts. What I like about having both options is that you can match the processing type to the material, rather than settling for a compromise.
Zero latency mode is perfect for tracking and real-time stuff, while linear phase is my go-to for mix bus work at the end. It takes a bit of trial and error to figure out when to use each, but trust me, the difference in sound is worth it.
- Match EQ Feature
The spectrum-matching function analyzes a reference track and suggests EQ adjustments to bring your mix closer to that tonal balance. I realized that this isn’t about copying someone else’s sound exactly, but rather understanding where your mix differs from professional references.
- Mid-Side Processing Per Band
Each EQ band can do its own mid-side thing, so you can treat the center and the sides however you want. This is a lifesaver for making synths wider without muddying up the bass, or cleaning up the sides while keeping vocals strong in the middle.
The ability to view the mid and side spectra separately helps you make informed decisions about stereo imaging. Maybe the most practical use I’ve found is cutting low frequencies only from the sides, which tightens bass while maintaining stereo width in the higher frequencies. You know, this kind of targeted control just isn’t possible with standard stereo EQ processing.
- Piano Roll Frequency Display
The interface can show frequencies as notes on a piano roll, not just boring Hz numbers. This totally changes how you think about EQ, because you can see exactly when you’re boosting or cutting notes that actually matter for your track’s key.
It turns out that thinking in musical terms rather than technical frequency numbers often leads to more musical EQ decisions.
Basically, when you see you’re boosting the fundamental note of your bassline versus some arbitrary frequency, the adjustments start making more harmonic sense. If anything, this feature alone has made me more intentional about EQ placement rather than randomly sweeping until something sounds better.
6. FabFilter Pro-C 3
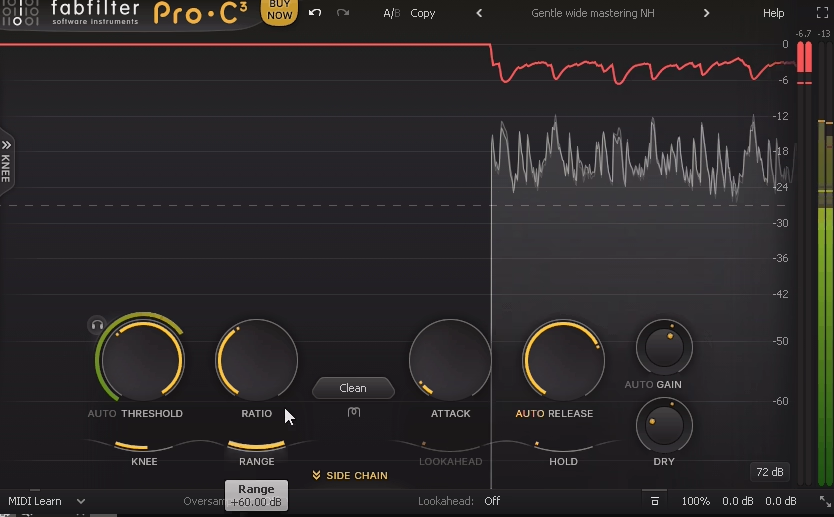
Pro-C 3 is all about giving you total control and making compression easy to understand. You get eight different compression styles, from super clean digital to classic vintage hardware vibes. The real game-changer for me is the real-time visualizer, where you can literally see the gain reduction, input and output levels, and the compression curve moving as your audio plays. It’s honestly one of the coolest features I’ve seen in a compressor.
For producers working in EDM and house, where dynamics control can make or break a track’s energy, I’d say having this level of visual feedback removes the guesswork that typically makes compression feel like black magic.
The main interface displays a dynamic waveform that shows exactly how compression affects your audio in real time. Watching the waveform change as you adjust parameters taught me more about compression than years of reading articles ever did.
I found that seeing peak reduction versus average level control helped me understand when I was squashing transients versus controlling overall dynamics. The side-chain input display also shows the trigger signal when using external side-chaining, eliminating confusion about what’s actually causing the compression to activate. Basically, the visual feedback loop accelerates learning because you’re connecting what you hear with what you see happening to the audio.
- Eight Compression Algorithms
Pro-C 3 includes eight compressor types, ranging from classic hardware to modern digital designs, each with distinct tonal characteristics. The clean algorithm is completely transparent for surgical dynamic control, while the vocal setting adds subtle harmonic content that enhances presence.
I realized that punch mode is incredibly effective on drums because it emphasizes transients while controlling the sound’s body. What’s useful here is that switching between algorithms on the same material reveals how different compression styles affect tone beyond just dynamic reduction.
Having all these options in one plugin means you’re not wasting time loading up a bunch of different compressors just to find the right sound for each track.
- Lookahead and Hold Functions
On top of that, the lookahead feature lets the compressor see what’s coming before it hits, so you don’t get those nasty overshoots on fast transients. Honestly, this is a must-have for anything with sudden peaks where you need the compression to kick in instantly and cleanly. The hold control is also super handy as it keeps the gain reduction going for a set time after the signal drops, which makes the compression sound way smoother and more musical.
- Mid-Side and Stereo Linking
You can compress the mid and side channels separately, which gives you super precise control over what’s happening in the center versus the sides of your mix. I love being able to tame vocals right in the middle without messing with the stereo synths, or the other way around.
Stereo linking lets you decide how much the left and right channels affect each other during compression, which is huge for keeping your stereo image solid. Tweaking this on wide pads or effects stops the stereo field from wobbling around when the compressor kicks in. Most people ignore these controls, but honestly, they’re crucial if you want your mixes to sound pro, especially in busy electronic tracks.
- Expert Mode and Side-Chain Filtering
When you flip into expert mode, you get access to all the advanced stuff like external side-chain filtering and audition. The side-chain EQ is a lifesaver, as you can make the compressor react to specific frequencies, which is perfect for de-essing or getting creative with frequency-based ducking.
7. Devious Machines Infiltrator 2
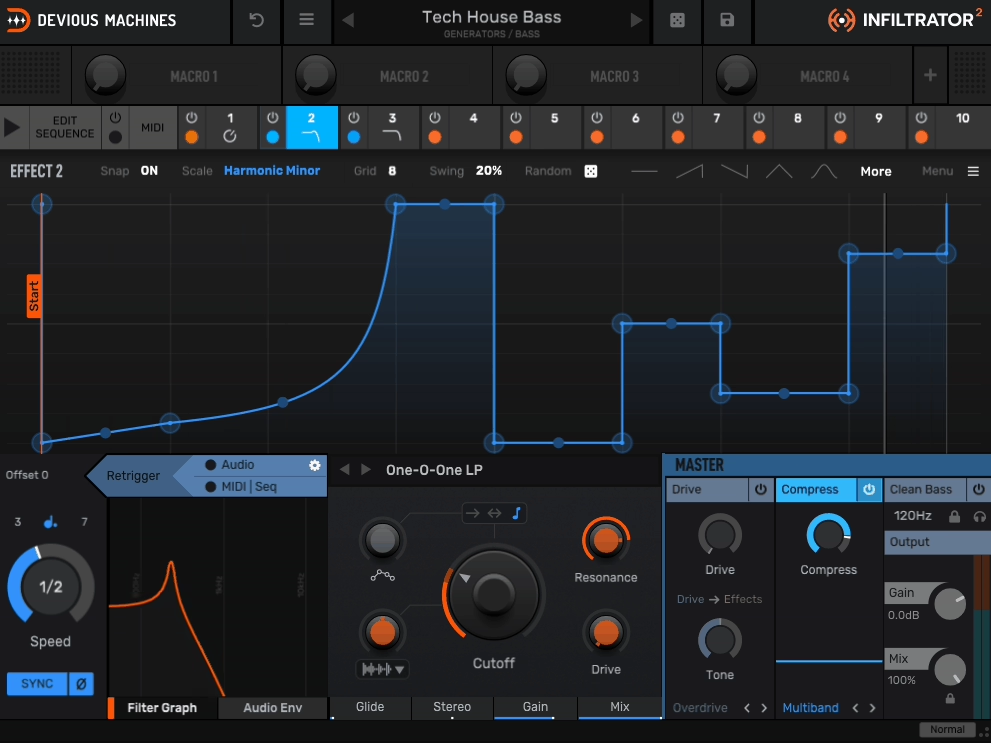
The problem with adding movement to electronic music isn’t a lack of effect plugins. Building interesting rhythmic effects often means spending hours drawing automation curves or stacking multiple LFOs that drift out of sync with your tempo.
Infiltrator 2 puts a visual step sequencer at the heart of your effects chain, letting you program exactly how filters, distortion, and spatial effects evolve across 32 steps that lock perfectly to your project’s grid.
I realized quickly that this workflow is more creative than traditional effect routing because you think in terms of rhythmic movement rather than individual parameter adjustments.
The visual feedback shows you how each effect transforms your sound step by step, removing the trial and error that usually comes with building complex modulation. Seeing your entire modulation pattern while hearing it transform your audio makes the creative process feel immediate and intentional instead of like guesswork with invisible parameters.
- Sequenced Modulation Engine
The 32-step sequencer controls up to eight effect parameters at once and lets you program synchronized movement across your entire effect chain. You can draw curves instead of just setting discrete values, which creates smooth transitions between different effect states.
Applying preset groove templates lets you instantly add swing, triplet patterns, or other rhythmic feels to your modulation without programming every step manually. This bridges the gap between simple LFO modulation and complex automation, giving you precise control while keeping the workflow fast and intuitive.
At least for my productions, being able to visualize how filter cutoff, distortion amount, and reverb size change over time makes it way easier to create intentional movement.
- Comprehensive Effect Selection
The plugin includes ten effect types covering filters, distortion, bit crushing, delay, reverb, and more, all running in a flexible signal chain.
What stands out is how each effect is designed for rhythmic modulation rather than just being generic processors. The multimode filter is especially useful because it offers everything from gentle resonant sweeps to aggressive self-oscillating madness that you can sequence step by step.
The distortion algorithms range from subtle saturation to completely destructive processing, and sequencing the drive amount creates evolving timbral changes that static distortion cannot match. Having everything in one interface means you are not bouncing between multiple plugins trying to coordinate their timing.
- Pattern Randomization Tools
The intelligent randomization function generates new modulation patterns while respecting the musical constraints you set.
- Flexible Routing Architecture
Routing options include parallel and serial processing paths, letting you maintain your dry signal while blending in sequenced effects or chaining everything together for complete transformation. Parallel processing is essential for maintaining punch while adding atmospheric effects, especially on drums and bass.
The mix control for each effect lets you blend subtle amounts of processing instead of going all in with every effect. This routing flexibility separates it from simpler step-sequenced effects because you can build complex signal paths.
Splitting your signal and processing different elements independently while keeping everything locked to the same sequence creates depth that single-chain effects cannot.
8. Baby Audio Crystalline
Most reverb plugins either sound clean but lack character, or they add personality but quickly make your mix muddy. I’ve tried many, looking for one that adds space without ruining the clarity of my carefully EQ’d tracks.
Crystalline by Baby Audio stands out because it uses algorithmic reverb with built-in ducking and modulation. This keeps your original sound clear while adding depth and space around it.
The ducking feature completely changed how I use reverb. Instead of having to side-chain or automate the wet/dry mix myself, the plugin lowers the reverb when the main sound is playing and brings it back during pauses. For dance music, where you need both clarity and space, this finally solves the problem of getting lush reverb tails without losing a tight, punchy mix.
- Reverb Algorithm Quality
The algorithmic engine creates dense, smooth tails that sound closer to high-end hardware units than typical digital reverb. I must say, the decay is particularly impressive because it fades naturally without the grainy artifacts or metallic ringing that plague cheaper reverb algorithms. The density control adjusts how quickly the early reflections build into a continuous tail, which affects whether the reverb sounds like a real space or an abstract effect.
What stands out to me is how the reverb maintains clarity even at extreme settings. I noticed that pushing decay times past five seconds doesn’t create the muddy mess I’d expect from most plugins. In my opinion, this sound quality is the foundation that makes all the other features actually usable, without great-sounding reverb to start with, ducking and modulation can’t save it.
- Modulation Matrix
Crystalline offers chorus, shimmer, and reverse modulation modes that turn simple reverb into moving textures. The shimmer effect stands out to me because it adds octave-up harmonics, creating airy, otherworldly tails that still sound natural. The chorus adds gentle pitch changes, making the reverb wider and less static.
These modulation options make the plugin more than just a way to add space—they turn it into a real sound design tool. The reverse mode plays the reverb tail backwards, giving you the build-up effects common in modern electronic music. Having these features built in saves me from using extra plugins just to add movement to reverb tails.
- Multi-Band Processing
The built-in three-band EQ lets you shape only the reverb sound, leaving your original track untouched. You can make the reverb darker for a subtle effect or brighter for more presence, all without changing your main sound.
The cutoff filters act before the reverb, so you can choose which frequencies get processed. This helps prevent low-end rumble from building up in the reverb tails.
In my experience, this level of tonal control is what makes a reverb truly useful, unlike preset-only plugins that are hit or miss. Cutting lows and boosting highs in the reverb gives you that airy, polished sound found in pro vocal mixes. Even with bold EQ settings, the sound stays natural and not overly processed.
- Preset Library Organization
The plugin comes with over 200 presets, organized by musical use instead of technical details.
- Width and Stereo Control
The stereo width control lets you set how wide the reverb sounds in your mix, from tight mono to wide stereo. Narrow settings keep sounds centered and focused, while wide settings create a spacious, immersive feel.
Mid-side processing lets you apply different reverb amounts to center and side information, which is incredibly useful for maintaining vocal presence while widening background elements.
9. Sonic Academy Kick 3
Sonic Academy Kick 3 is a kick drum synthesizer that creates low-end sounds from scratch, so you don’t have to rely on sample libraries. I’ve tried many sample packs with kicks that sound good alone but get lost or clash when you add bass. This plugin fixes that by letting you design kicks tuned to your track’s key and mix.
The synthesis engine lets you control pitch, harmonics, and transients, so you can build kicks that fit your production instead of adjusting your track to fit pre-made samples.
The visual waveform display shows how your kick’s tone and punch change over time. This takes away the guesswork, so you know if you’re making a tight, punchy kick or a boomy sound that uses too much headroom.
In house and EDM, the kick is key. Being able to shape the low-end precisely is what separates amateur tracks from professional ones.
- Layered Synthesis Architecture
The plugin uses three separate synthesis layers that blend click, body, and sub frequencies into a cohesive kick sound. I realized pretty quickly that having independent control over each layer is essential because the click provides attack, the body gives character, and the sub delivers weight.
You can use the pitch envelope for each layer to make anything from tight 808-style kicks to big techno thumps with long sub decay.
I like that you can tune each layer to work with your bassline and avoid frequency clashes. Adjusting the sub layer’s pitch curve while keeping the click steady gives you much more control than EQing a finished sample.
In my tracks, this control means the kick and bass always fit together without competing for the same frequencies.
- Harmonic Shaping Tools
The harmonic saturation and distortion controls add upper harmonics, helping kicks stand out in busy mixes without just turning up the volume. A kick with shaped harmonics sounds much better in a mix than a plain sine wave.
The tone control changes the harmonics of the whole kick, so you can make it sound clean and pure or dirty and aggressive.
Adding a bit of harmonics helps kicks be heard on small speakers and earbuds, where sub frequencies often get lost. But be careful, as too many harmonics can make kicks sound thin or harsh.
In my opinion, the sweet spot is usually to add just enough harmonic content to define the kick’s character without losing its fundamental weight.
- Built-In Effects Chain
Kick 3 comes with compression, EQ, and distortion made just for kick drums. I like that these effects are tuned for low-end sounds instead of being general-purpose tools.
The compressor’s attack and release are set for kick drums, so you get steady punch without the pumping problems you get from regular compressors.
- Sub Bass Integration
The tuning and key detection features help you match the kick’s pitch to your track’s key, which stops phase problems with the bassline.
I think this feature is really underrated, since out-of-tune kicks cause the muddy low-end you often hear in amateur tracks. The pitch display shows the exact note of your kick, so you can easily match it with your bass synth.
10. Matt Tytel Vital (Free)
Vital gives you pro-level wavetable synthesis, unlimited voices, and a full-on modulation system and all for free.
You get unlimited modulation sources, and the drag-and-drop workflow is just awesome. You can literally grab any envelope, LFO, or macro and slap it onto any knob for instant modulation, so it’s super intuitive. Plus, the way Vital shows you exactly how much modulation is happening makes it so much easier to see what’s going on, instead of guessing like with other synths.
I realized that having visual feedback on every modulation connection makes it way easier to understand complex patches. The ability to modulate modulators creates layered movement that would take ages to program with traditional automation.
- Filter Design and Types
Vital packs in many filter models, such as analog-style, comb, formant, and even phase dispersion types. Honestly, the filters sound just great. The resonance stays smooth and never gets that harsh, metallic edge you hear in a lot of other synths.
The dual filter routing lets you run filters in series or parallel, or morph between them, creating tonal possibilities beyond single-filter designs. What stands out to me is how the filters respond to modulation without losing their character. I noticed that sweeping the filter cutoff with an envelope maintains the analog warmth even at extreme settings.
- Effect Rack Quality
You also get nine effect slots loaded with everything you need, including reverb, delay, chorus, flanger, phaser, distortion, EQ, compressor, and filter. All of them sound super polished and pro. The reverb, especially, is a winner for me – it adds space without that weird metallic ring you get in a lot of synth reverbs.
The stereo processing on effects like chorus and phaser gives you that wide, lush sound without any weird phase problems.
- Performance Features
The built-in arpeggiator and sequencer are packed with pattern-based tools – you can tweak the gate, octave range, and rhythm however you want. What’s really cool is that the sequencer can modulate any parameter, so you can create step-sequenced changes to your sound, not just your notes. And if you’ve got an MPE controller, Vital responds to per-note pitch bend and pressure, which is just awesome for expressive playing.
Honestly, these performance features make Vital feel like a real instrument, not just another sound generator. The arpeggiator patterns are actually inspiring, going way beyond the usual up-and-down stuff and sparking new musical ideas. Having these tools built in means you’ll discover cool sounds just by playing around, not just by programming everything in.
- Visual Wavetable Editor
The built-in wavetable editor lets you import audio, draw custom waveforms, and morph between existing wavetables with complete visual feedback. I found this makes wavetable synthesis actually understandable because you see exactly how the waveform shapes create different timbres. The 3D wavetable display shows the entire wavetable structure at once, helping you understand what happens when you modulate the wavetable position.
11. Surge XT (Free)
This one is honestly one of the best free synths out there, and it actually started life as a paid plugin before going open-source. That means you’re getting a pro-level synth engine for absolutely nothing. It’s a hybrid beast, packing wavetable, virtual analog, and FM synthesis all in one, with a modulation system that’s just as deep as any paid synth. You get three oscillators per voice, dual filters, and a modulation setup that can go toe-to-toe with the big names.
Each voice gives you three separate oscillators, and you can pick from classic wavetables, analog-style waves, FM, window oscillators, and even some wild alias generators. The amount of sound design you can do in just one instance is insane. Wavetable morphing lets you get those evolving, animated sounds, and the analog modes actually sound warm and not fake or plasticky.
What I love most is you can mix and match all these synthesis types in a single patch. Want to layer some FM bells on top of a fat analog bass and throw in a wavetable pad? You can do it all in one go, no need to stack up a bunch of different synths.
Surge XT actually gives you two full synths in one, called scenes. You can layer them, split them across your keyboard, or morph between them with a crossfade. Each scene has its own oscillators, filters, and modulation, so you can go from one sound to something totally different just by moving a knob or automating the morph. It’s like having two synths for the price of none.
- Effects Processing Chain
Also, the plugin includes multiple effect slots with reverb, delay, distortion, chorus, phaser, rotary speaker, and more, all running at high quality. I appreciate how effects can be applied globally or routed per-scene for independent processing. The reverb and delay are particularly usable, with enough control to shape space without needing external plugins.
From my experience, having quality effects built in means you can create finished sounds ready for your mix. I would recommend exploring the effect routing because you can create parallel processing within the synth itself.
At the end of the day, having everything in one place keeps you focused on sound design instead of juggling a million plugin windows.
- Active Development Community
Since it’s open-source, Surge XT gets regular updates, bug fixes, and new features from devs all over the world. The community is super active, and the forums and docs are honestly as good as what you’d get with paid plugins. The coolest part is that user feedback actually shapes what gets added or improved.
In the end, I realized that feature requests and improvements come from actual users, not corporate roadmaps. In the long run, this community-driven approach means the synth adapts to what producers actually need rather than what marketing departments think they want.
- Extensive Modulation System
The modulation matrix supports unlimited modulation routings with dozens of sources, including LFOs, envelopes, MIDI, and macro controls. I love how you can assign multiple sources to single destinations with independent depth controls. The LFO section offers multiple waveform types, tempo sync, and deformable shapes that go beyond basic sine and square waves.
I created ModulateBass to share the latest updates on top-quality plugins with you. Most plugins featured here offer trial versions, and when you buy through retailers like PluginBoutique, Native Instruments, or Plugin Alliance, you help keep this site running through commissions without paying anything extra.
I only showcase plugins I actually use or would genuinely choose for my own work. Price tags don’t influence my recommendations. If I love a plugin, I’ll feature it regardless of cost. For pricier options, I always suggest trying the demo first when possible. Trial versions typically include full functionality, giving you a complete experience before committing. I hope my content proves valuable for your needs. Thanks for stopping by.